在这篇文章中,我们将深入研究计算机科学和软件开发中的一个关键主题:数据结构。这绝对是任何在软件开发领域工作的人都必须了解的主题,但当你刚开始接触时可能会难以理解,甚至有点令人生畏。在本文中,我将尝试简要解释数据结构是什么,它们何时有用,以及我们如何使用 JavaScript 实现它们。
让我们开始吧!
什么是数据结构?
在计算机科学中,数据结构是以一种允许 有效访问和修改 的方式组织、管理和存储数据的格式。更确切地说,数据结构是数据值的集合,它们之间的关系,以及可以应用于该数据的函数或操作。
这些定义一开始可能听起来有点抽象,但想一想。如果你已经编码了一段时间,你肯定曾经使用过数据结构。
你使用过数组和对象吗?它们都是数据结构。它们都是一组相互关联的值,可以由你操作。😉
// 包含值1、2和3的集合
const arr = [1, 2, 3]

// 每个值在索引数组位置上都与其他值相关联
const indexOfTwo = arr.indexOf(2)
console.log(arr[indexOfTwo-1]) // 1
console.log(arr[indexOfTwo+1]) // 3

// 我们可以对数组执行许多操作,例如将新值推送到其中
arr.push(4)
console.log(arr) // [1,2,3,4]JavaScript具有原始(内建)和非原始(非内建)数据结构。原始数据结构是编程语言默认提供的,你可以直接使用它们(如数组和对象)。非原始数据结构不是默认提供的,如果要使用它们,你必须自己编写代码。
不同的数据结构之所以存在,是因为其中一些更适合特定类型的操作。你可能能够使用内置的数据结构解决大多数编程任务,但对于一些非常特定的任务,可能需要使用非原始数据结构。
现在让我们了解一下最流行的数据结构,并查看它们是如何工作的,它们在哪些场合有用,以及我们如何在JavaScript中对它们进行编码。
数组
数组是存储在连续内存位置的项目集合。
可以通过其索引(位置)号访问每个项目。数组始终从索引 0 开始,因此在包含 4 个元素的数组中,我们可以使用索引号 2 访问第 3 个元素。
const arr = ['a', 'b', 'c', 'd']
console.log(arr[2]) // c数组的长度属性定义为它包含的元素数。如果数组包含4个元素,我们可以说该数组的长度为4。
const arr = ['a', 'b', 'c', 'd']
console.log(arr.length) // 4
在某些编程语言中,用户只能在一个数组中存储相同类型的值,并且数组的长度必须在创建时定义,并且不能在之后修改。
在JavaScript中,情况并非如此,因为我们可以在同一数组中存储任何类型的值,而其长度可以是动态的(可以根据需要增长或缩小)。
const arr = ['store', 1, 'whatever', 2, 'you want', 3]任何数据类型都可以存储在数组中,包括数组。一个包含其他数组的数组称为多维数组。
const arr = [
  [1,2,3],
  [4,5,6],
  [7,8,9],
]
在JavaScript中,数组带有许多内置属性和方法,我们可以用不同的目的使用这些方法,例如向数组添加或删除项目,对其进行排序,过滤其值,知道其长度等等。你可以在这里找到完整的数组方法列表 here。😉
正如我提到的,在数组中,每个元素都有一个由其在数组中的位置定义的索引。当我们在数组末尾添加新项目时,它只占据了数组中前一个项目的索引号。
但是,当我们在数组开头或中间添加/删除一个新项目时,在添加/删除的元素之后的所有元素的索引都必须被更改。这当然具有计算成本,也是这种数据结构的弱点之一。
数组在我们需要存储单个值并从数据结构的末尾添加/删除值时非常有用。但当我们需要从任何位置添加/删除值时,有其他数据结构的性能更高(我们将在后面讨论它们)。
对象(哈希表)
在JavaScript中,对象是键-值对的集合。在其他编程语言中,这种数据结构也称为 map、dictionary或hash-table。
典型的JS对象看起来像这样:
const obj = {
  prop1: "I'm",
  prop2: "an",
  prop3: "object"
}
我们使用花括号声明对象。然后声明每个键,后跟冒号,以及相应的值。
一个重要的事情要提到的是,每个键在对象内必须是唯一的。不能有两个具有相同名称的键。
对象可以存储值和函数。在谈论对象时,值被称为属性,而函数被称为方法。
const obj = {
  prop1: "Hello!",
  prop3: function() {
    console.log("I'm a property dude!")
  }
}要访问属性,可以使用两种不同的语法,要么object.property,要么object["property"]。要访问方法,我们调用object.method()。
console.log(obj.prop1) // "Hello!"
console.log(obj["prop1"]) // "Hello!"
obj.prop3() // "I'm a property dude!"
分配新值的语法相当相似:
obj.prop4 = 125
obj["prop5"] = "The new prop on the block"
obj.prop6 = () => console.log("yet another example")

console.log(obj.prop4) // 125
console.log(obj["prop5"]) // "The new prop on the block"
obj.prop6() // "yet another example"与数组一样,在JavaScript中,对象带有许多内置方法,允许我们执行不同的操作并从给定对象获取信息。完整列表可以在这里找到。
对象是将具有共同点或某种关系的数据组合在一起的好方法。此外,由于属性名称是唯一的,因此在我们必须根据唯一条件将数据分开时,对象会很方便。
一个例子可能是计算喜欢不同食物的人数:
const obj = {
  pizzaLovers: 1000,
  pastaLovers: 750,
  argentinianAsadoLovers: 12312312312313123
}
栈
栈是一种以列表形式存储信息的数据结构。它们仅允许按照 LIFO 模式(后进先出)添加和删除元素。在栈中,元素不能按顺序添加或删除,它们必须始终遵循 LIFO 模式。
为了理解它是如何工作的,想象一下桌子上一叠纸。只能通过将它们放在其他所有纸张的顶部来向栈中添加更多的纸张。你只能通过取最上面的纸来从栈中移除一张纸。后进先出,LIFO。😉

一叠纸
当我们需要确保元素遵循 LIFO 模式时,栈非常有用。一些使用栈的例子包括:
- JavaScript 的调用堆栈。
- 在各种编程语言中管理函数调用。
- 许多程序提供的撤销/重做功能。
实现栈的方法不止一种,但可能最简单的方法之一是使用具有其推入(push)和弹出(pop)方法的数组。如果我们只使用pop和push添加和删除元素,我们将始终遵循 LIFO 模式,因此可以将其视为栈进行操作。
另一种方法是将其实现为链表,可能看起来像这样:
// We create a class for each node within the stack
class Node {
  // Each node has two properties, its value and a pointer that indicates the node that follows
  constructor(value){
    this.value = value
    this.next = null
  }
}

// We create a class for the stack
class Stack {
  // The stack has three properties, the first node, the last node and the stack size
  constructor(){
    this.first = null
    this.last = null
    this.size = 0
  }
  // The push method receives a value and adds it to the "top" of the stack
  push(val){
    var newNode = new Node(val)
    if(this.first == null){
        this.first = newNode
        this.last = newNode
    } else {
        var temp = this.first
        this.first = newNode
        this.first.next = temp
    }
    return ++this.size
  }
  // The pop method eliminates the element at the "top" of the stack and returns its value
  pop(){
    if(this.first == null) return null
    var temp = this.first
    if(this.first === this.last){
        this.last = null
    }
    this.first = this.first.next
    this.size--
    return temp.value
  }
}

const stack= new Stack

stack.push("value1")
stack.push("value2")
stack.push("value3")

console.log(stack.first)
/*
  Node {
    value: 'value3',
    next: Node { value: 'value2', next: Node { value: 'value1', next: null } }
  }
*/
console.log(stack.last) // Node { value: 'value1', next: null }
console.log(stack.size) // 3

stack.push("value4")
console.log(stack.pop()) // value4
栈方法的大O表示法如下:
- 插入 - O(1)
- 删除 - O(1)
- 搜索 - O(n)
- 访问 - O(n)
队列
队列的工作方式与栈非常相似,但元素按不同的模式进行添加和删除。队列仅允许FIFO模式(先进先出)。在队列中,元素不能按顺序添加或删除,它们必须始终遵循FIFO模式。
为了理解这一点,想象一下排队买食物的人们。这里的逻辑是,如果你首先进入队列,你将首先被服务。如果你首先到达那里,你将第一个离开。先进先出,FIFO。😉

客户的队列
队列的一些使用示例包括:
- 后台任务。
- 打印/任务处理。
与栈一样,实现队列的方法不止一种。但可能最简单的方法之一是使用具有其推入(push)和移出(shift)方法的数组。
如果我们只使用push和shift添加和删除元素,我们将始终遵循 FIFO 模式,因此可以将其视为队列进行操作。
另一种方法是将其实现为链表,可能看起来像这样:
// We create a class for each node within the queue
class Node {
  // Each node has two properties, its value and a pointer that indicates the node that follows
  constructor(value){
    this.value = value
    this.next = null
  }
}

// We create a class for the queue
class Queue {
  // The queue has three properties, the first node, the last node and the queue size
  constructor(){
    this.first = null
    this.last = null
    this.size = 0
  }
  // The enqueue method receives a value and adds it to the "end" of the queue
  enqueue(val){
    var newNode = new Node(val)
    if(this.first == null){
      this.first = newNode
      this.last = newNode
    } else {
      this.last.next = newNode
      this.last = newNode
    }
    return ++this.size
  }
  // The dequeue method eliminates the element at the "beginning" of the queue and returns its value
  dequeue(){
    if(this.first == null) return null

    var temp = this.first
    if(this.first === this.last) {
      this.last = null
    }
    this.first = this.first.next
    this.size--
    return temp.value
  }
}

const quickQueue = new Queue

quickQueue.enqueue("value1")
quickQueue.enqueue("value2")
quickQueue.enqueue("value3")

console.log(quickQueue.first)
/*
  Node {
    value: 'value1',
    next: Node { value: 'value2', next: Node { value: 'value3', next: null } }
  }
*/
console.log(quickQueue.last) // Node { value: 'value3, next: null }
console.log(quickQueue.size) // 3

quickQueue.enqueue("value4")
console.log(quickQueue.dequeue()) // value1
链表
链表是一种存储值的列表形式的数据结构。在链表中,每个值被视为节点,并且每个节点通过指针与链表中的下一个值(或在该元素是链表中最后一个元素时为 null)相连接。
链表有两种类型,单链表和双链表。两者工作方式非常相似,但区别在于单链表中的每个节点都有一个单一指针,指示链表中的下一个节点。而在双链表中,每个节点有两个指针,一个指向下一个节点,另一个指向上一个节点。

在单链表中,每个节点只有一个
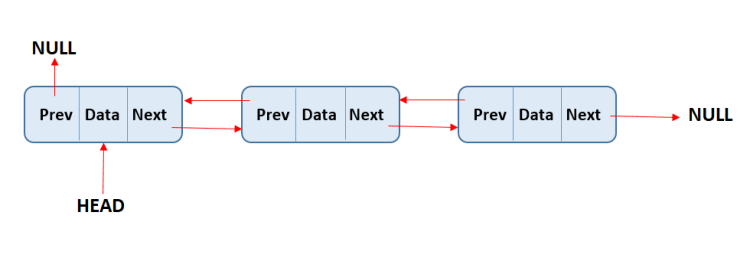
在双链表中,每个节点有两个指针
链表的第一个元素被视为头,最后一个元素被视为尾。与数组一样,长度属性定义为链表包含的元素数。
与数组相比,主要区别如下:
- 链表没有索引。每个值只通过指针与其相连的值“知道”它。
- 由于链表没有索引,我们无法随机访问值。当我们想要访问值时,我们始终必须从头或尾开始通过迭代链表来查找。
- 不具有索引的好处是,在链表的任何部分进行插入/删除比使用数组更高效。我们只需要重定向“邻居”值的指针,而在数组中,需要重新索引值。
与任何数据结构一样,为了在数据上操作,链表实现了不同的方法。最常见的方法包括:push、pop、unshift、shift、get、set、insert、remove 和 reverse。
首先让我们看看如何实现单链表,然后是双链表。
单链表
单链表的完整实现可能如下所示:
// We create a class for each node within the list
class Node {
  // Each node has two properties, its value and a pointer that indicates the node that follows
  constructor(val) {
    this.val = val
    this.next = null
  }
}

// We create a class for the list
class SinglyLinkedList {
  // The list has three properties, the head, the tail and the list size
  constructor() {
    this.head = null
    this.tail = null
    this.length = 0
  }
  // The push method takes a value as parameter and assigns it as the tail of the list
  push(val) {
    const newNode = new Node(val)
    if (this.head == null) {
      this.head = newNode
      this.tail = this.head
    } else {
      this.tail.next = newNode
      this.tail = newNode
    }
    this.length++
    return this
  }
  // The pop method removes the tail of the list
  pop() {
    if (this.head == null) return null
    const current = this.head
    const newTail = current
    while (current.next) {
      newTail = current
      current = current.next
    }
    this.tail = newTail
    this.tail.next = null
    this.length--
    if (this.length === 0) {
      this.head = null
      this.tail = null
    }
    return current
  }
  // The shift method removes the head of the list
  shift() {
    if (this.head == null) return null
    var currentHead = this.head
    this.head = currentHead.next
    this.length--
    if (this.length === 0) {
      this.tail = null
    }
    return currentHead
  }
  // The unshift method takes a value as parameter and assigns it as the head of the list
  unshift(val) {
    const newNode = new Node(val)
    if (this.head == null) {
      this.head = newNode
      this.tail = this.head
    }
    newNode.next = this.head
    this.head = newNode
    this.length++
    return this
  }
  // The get method takes an index number as parameter
  // and returns the value of the node at that index
  get(index) {
    if (index < 0 || index >= this.length) return null
    const counter = 0
    const current = this.head
    while (counter !== index) {
      current = current.next
      counter++
    }
    return current
  }
  // The set method takes an index number and a value as parameters,
  // and modifies the node value at the given index in the list
  set(index, val) {
    const foundNode = this.get(index)
    if (foundNode) {
      foundNode.val = val
      return true
    }
    return false
  }
  // The insert method takes an index number and a value as parameters,
  // and inserts the value at the given index in the list
  insert(index, val) {
    if (index < 0 || index > this.length) return false
    if (index === this.length) return !!this.push(val)
    if (index === 0) return !!this.unshift(val)

    const newNode = new Node(val)
    const prev = this.get(index - 1)
    const temp = prev.next
    prev.next = newNode
    newNode.next = temp
    this.length++
    return true
  }
  // The remove method takes an index number as parameter
  // and removes the node at the given index in the list
  remove(index) {
    if (index < 0 || index >= this.length) return null
    if (index === 0) return this.shift()
    if (index === this.length - 1) return this.pop()
    const previousNode = this.get(index - 1)
    const removed = previousNode.next
    previousNode.next = removed.next
    this.length--
    return removed
  }
  // The reverse method reverses the list and all pointers
  // so that the head becomes the tail and the tail becomes the head
  reverse() {
    const node = this.head
    this.head = this.tail
    this.tail = node
    let next
    const prev = null
    for (let i = 0; i < this.length; i++) {
      next = node.next
      node.next = prev
      prev = node
      node = next
    }
    return this
  }
}
单链表方法的复杂度如下:
- 插入 - O(1)
- 删除 - O(n)
- 搜索 - O(n)
- 访问 - O(n)
双链表
如前所述,双链表与单链表的区别在于双链表的节点通过指针同时连接到前一个和下一个值。另一方面,单链表仅将其节点与下一个值相连。
这种双指针方法使得双链表在某些方法中相对于单链表表现更好,但以占用更多内存为代价(在双链表中,我们需要存储两个指针,而不是一个)。
完整实现可能如下:
// We create a class for each node within the list
class Node {
  // Each node has three properties, its value, a pointer that
  // indicates the node that follows and a pointer that indicates the previous node
  constructor(val) {
    this.val = val;
    this.next = null;
    this.prev = null;
  }
}

// We create a class for the list
class DoublyLinkedList {
  // The list has three properties, the head, the tail and the list size
  constructor() {
    this.head = null
    this.tail = null
    this.length = 0
  }
  // The push method takes a value as parameter and assigns it as the tail of the list
  push(val) {
    const newNode = new Node(val)
    if (this.length === 0) {
      this.head = newNode
      this.tail = newNode
    } else {
      this.tail.next = newNode
      newNode.prev = this.tail
      this.tail = newNode
    }
    this.length++
    return this
  }
  // The pop method removes the tail of the list
  pop() {
    if (this.head == null) return null
    const poppedNode = this.tail
    if (this.length === 1) {
      this.head = null
      this.tail = null
    } else {
      this.tail = poppedNode.prev
      this.tail.next = null
      poppedNode.prev = null
    }
    this.length--
    return poppedNode
  }
  // The shift method removes the head of the list
  shift() {
    if (this.length === 0) return null
    const oldHead = this.head
    if (this.length === 1) {
      this.head = null
      this.tail = null
    } else {
      this.head = oldHead.next
      this.head.prev = null
      oldHead.next = null
    }
    this.length--
    return oldHead
  }
  // The unshift method takes a value as parameter and assigns it as the head of the list
  unshift(val) {
    const newNode = new Node(val)
    if (this.length === 0) {
      this.head = newNode
      this.tail = newNode
    } else {
      this.head.prev = newNode
      newNode.next = this.head
      this.head = newNode
    }
    this.length++
    return this
  }
  // The get method takes an index number as parameter and returns the value of the node at that index
  get(index) {
    if (index < 0 || index >= this.length) return null
    let count, current
    if (index <= this.length / 2) {
      count = 0
      current = this.head
      while (count !== index) {
        current = current.next
        count++
      }
    } else {
      count = this.length - 1
      current = this.tail
      while (count !== index) {
        current = current.prev
        count--
      }
    }
    return current
  }
  // The set method takes an index number and a value as parameters,
  // and modifies the node value at the given index in the list
  set(index, val) {
    var foundNode = this.get(index)
    if (foundNode != null) {
      foundNode.val = val
      return true
    }
    return false
  }
  // The insert method takes an index number and a value as parameters,
  // and inserts the value at the given index in the list
  insert(index, val) {
    if (index < 0 || index > this.length) return false
    if (index === 0) return !!this.unshift(val)
    if (index === this.length) return !!this.push(val)

    var newNode = new Node(val)
    var beforeNode = this.get(index - 1)
    var afterNode = beforeNode.next

    beforeNode.next = newNode, newNode.prev = beforeNode
    newNode.next = afterNode, afterNode.prev = newNode
    this.length++
    return true
  }
}
双链表方法的大O表示法如下:
- 插入 - O(1)
- 删除 - O(1)
- 搜索 - O(n)
- 访问 - O(n)
树
树是一种将节点以父/子关系链接的数据结构,即存在依赖于其他节点或从其他节点引出的节点。

一棵树
树由一个根节点(树的第一个节点)组成,所有从该根节点引出的节点称为子节点。树的底部节点,没有“后代”的节点称为叶节点。树的高度由它的父/子连接数量确定。
与链表或数组不同,树是非线性的,因为在迭代树时,程序流可以在数据结构内部遵循不同的方向,因此到达不同的值。而在链表或数组上,程序只能沿着数据结构的一个极端迭代,始终按照相同的路径。
树形成的一个重要要求是节点之间的唯一有效连接是从父节点到子节点。在树中,不允许兄弟节点之间的连接或从子节点到父节点的连接(这些类型的连接形成图,一种不同类型的数据结构)。另一个重要要求是树必须只有一个根。
编程中使用树的一些示例包括:
- DOM 模型。
- 人工智能中的情境分析。
- 操作系统中的文件夹。
有许多不同的类型树。在每种类型的树中,值可能根据不同的模式组织,使得该数据结构在面对不同类型问题时更适用。最常用的树类型是二叉树和堆。
二叉树
二叉树是一种每个节点最多有两个子节点的树。
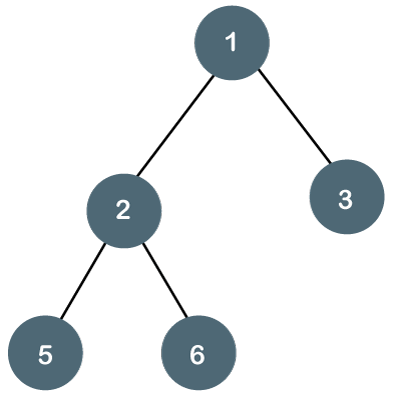
一棵二叉树
二叉树非常有用的一个关键情况是在搜索时。用于搜索的一种二叉树称为二叉搜索树(BST)。
BST 与二叉树相似,但其中的信息按一种使其适用于搜索的方式排序。
在 BST 中,值被排序,以便每个向其父节点左侧下降的节点的值必须小于其父节点,而每个向其父节点右侧下降的节点的值必须大于其父节点。
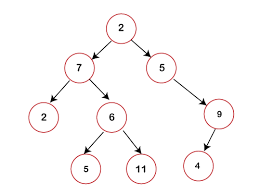
一棵二叉搜索树
这种值的顺序使得该数据结构非常适合搜索,因为在树的每个级别上,我们可以确定要查找的值是大于还是小于父节点,并通过该比较逐渐丢弃数据的大致一半,直到找到我们的值。
在插入或删除值时,算法将按照以下步骤进行:
- 检查是否有根节点。
- 如果有,检查要添加/删除的值是否大于或小于节点。
- 如果较小,请检查左侧是否有节点并重复前一个操作。如果没有,将节点添加/删除到该位置。
- 如果较大,请检查右侧是否有节点并重复前一个操作。如果没有,将节点添加/删除到该位置。
在 BST 中进行搜索非常相似,只是不是添加/删除值,而是检查节点是否与我们正在查找的值相等。
这些操作的大 O 复杂度是对数级别(log(n))。但是要认识到,为了实现这种复杂性,树必须具有平衡的结构,以便在每个搜索步骤中,可以“丢弃”大约一半的数据。如果更多的值存储在树的一侧或另一侧,数据结构的效率就会受到影响。
BST 的一个实现可能如下所示:
// We create a class for each node within the tree
class Node {
  // Each node has three properties, its value, a pointer
  // that indicates the node to its left and a pointer that indicates the node to its right
  constructor(value) {
    this.value = value
    this.left = null
    this.right = null
  }
}
// We create a class for the BST
class BinarySearchTree {
  // The tree has only one property which is its root node
  constructor() {
    this.root = null
  }
  // The insert method takes a value as parameter
  // and inserts the value in its corresponding place within the tree
  insert(value) {
    const newNode = new Node(value)
    if (this.root === null) {
      this.root = newNode
      return this
    }
    let current = this.root
    while (true) {
      if (value === current.value) return null
      if (value < current.value) {
        if (current.left === null) {
          current.left = newNode
          return this
        }
        current = current.left
      } else {
        if (current.right === null) {
          current.right = newNode
          return this
        }
        current = current.right
      }
    }
  }
  // The find method takes a value as parameter and iterates through the tree looking for that value
  // If the value is found, it returns the corresponding node and if it's not, it returns undefined
  find(value) {
    if (this.root === null) return false
    let current = this.root,
      found = false
    while (current && !found) {
      if (value < current.value) {
        current = current.left
      } else if (value > current.value) {
        current = current.right
      } else {
        found = true
      }
    }
    if (!found) return null
    return current
  }
  // The contains method takes a value as parameter
  // and returns true if the value is found within the tree
  contains(value) {
    if (this.root === null) return false
    let current = this.root,
      found = false
    while (current && !found) {
      if (value < current.value) {
        current = current.left
      } else if (value > current.value) {
        current = current.right
      } else {
        return true
      }
    }
    return false
  }
}
堆
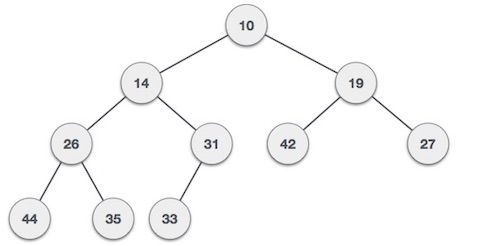
堆是另一种具有一些特殊规则的树。主要有两种堆,最大堆和最小堆。在最大堆中,父节点始终大于其子节点,而在最小堆中,父节点始终小于其子节点。
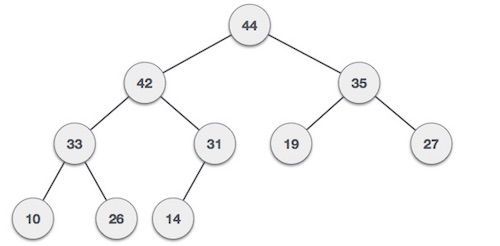
最大堆
最小堆
在这种数据结构中,兄弟节点之间没有保证,这意味着在同一“级别”的节点之间没有任何规则,只是相对于它们的父节点更高或更低。
此外,堆是尽可能紧凑的,这意味着每个级别包含它可能包含的所有节点,没有空白空间,并且新的子节点首先放在树的左侧空间中。
堆,特别是二叉堆,经常用于实现优先队列,优先队列又经常用于诸如 Dijkstra 的路径查找算法等著名算法中。
优先队列是一种数据结构,其中每个元素都有一个关联的优先级,并且具有更高优先级的元素首先出现。
图
图是由一组节点和这些节点之间的某些连接形成的数据结构。与树不同,图没有根节点和叶节点,也没有“头”或“尾”。不同的节点相互连接,它们之间没有隐式的父-子连接。
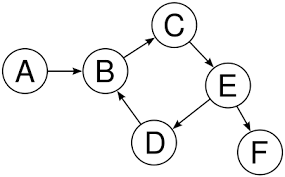
一个图
图通常用于:
- 社交网络
- 地理定位
- 推荐系统
根据节点之间连接的特征,图可以分为不同类型:
无向图和有向图
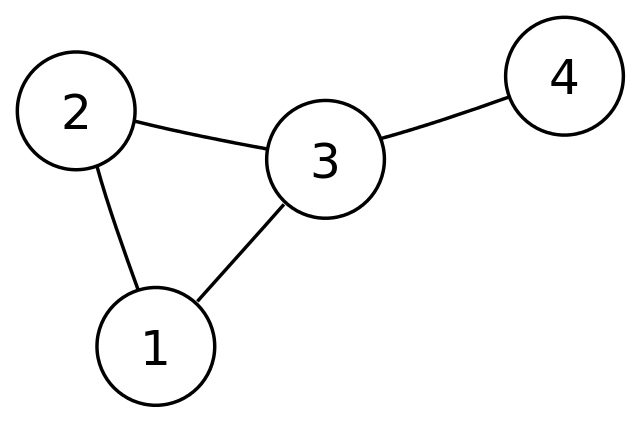
如果节点之间的连接没有隐式方向,我们说图是无向的。
如果我们看下面的示例图像,你会看到节点 2 和节点 3 之间的连接没有方向。连接是双向的,这意味着你可以从节点 2 遍历数据结构到节点 3,也可以从节点 3 遍历数据结构到节点 2。无向意味着节点之间的连接可以两者都使用。
一个无向图
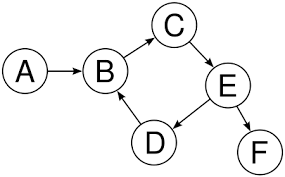
正如你可能已经猜到的那样,有向图正好相反。让我们重用前面的示例图像,并看到这里的节点之间的连接有一个隐式方向。
在这个特定的图中,你可以从节点 A 遍历到节点 B,但不能从节点 B 遍历到节点 A。
一个有向图
加权图和不加权图
如果节点之间的连接具有分配的权重,则我们说图是加权的。在这种情况下,权重只是分配给特定连接的值。这是关于连接本身的信息,而不是关于节点本身的信息。
根据此示例,我们可以看到节点 0 和节点 4 之间的连接的权重为 7。节点 3 和节点 1 之间的连接的权重为 4。
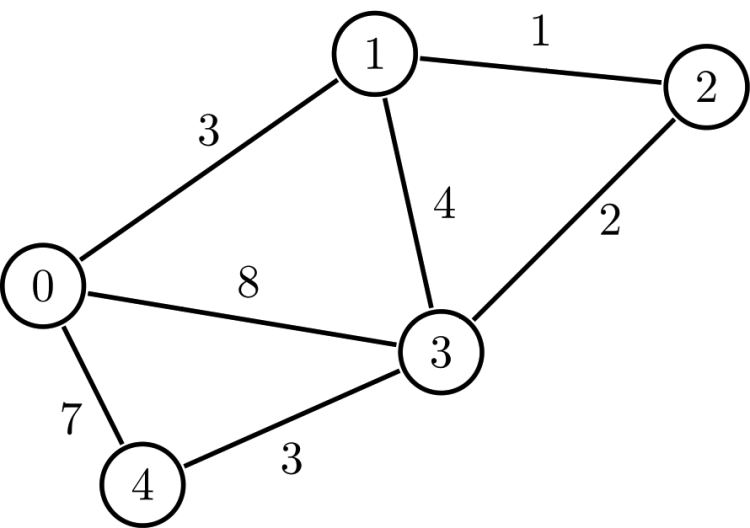
一个加权图
为了理解加权图的使用,想象一下如果你想要表示一个包含许多不同位置的地图,并向用户提供有关从一个地方到另一个地方可能需要多长时间的信息。加权图将是完美的选择,因为你可以使用每个节点保存有关位置的信息,连接可以表示每个地方之间的可用道路,而权重则表示从一个地方到另一个地方的物理距离。

加权图在地理定位系统中被广泛使用
正如你可能再次猜到的那样,不加权图是那些节点之间没有分配权重的图。因此,关于节点之间的连接没有特定信息,只有关于节点本身的信息。
如何表示图
在编码图时,有两种主要方法:邻接矩阵和邻接表。让我们解释一下它们的工作方式并查看它们的优缺点。
邻接矩阵是一种二维结构,表示我们图中的节点和它们之间的连接。
如果我们使用此示例...

我们的邻接矩阵将如下所示:
| A | B | C | D | |
|---|---|---|---|---|
| A | 0 | 1 | 1 | 0 |
| B | 1 | 0 | 0 | 1 |
| C | 1 | 0 | 0 | 1 |
| D | 0 | 1 | 1 | 0 |
你可以看到矩阵就像一张表,其中列和行表示图中的节点,单元格的值表示节点之间的连接。如果单元格为 1,则表示行和列之间存在连接,如果为 0,则不存在。
可以使用二维数组轻松复制表格:
[
    [0, 1, 1, 0],
    [1, 0, 0, 1],
    [1, 0, 0, 1],
    [0, 1, 1, 0]
]另一方面,邻接表可以被视为键值对结构,其中键表示图中的每个节点,而值是该特定节点具有的连接。
使用相同的示例图,我们的邻接表可以用以下对象表示:
{
  A: ['B', 'C'],
  B: ['A', 'D'],
  C: ['A', 'D'],
  D: ['B', 'C'],
}
你可以看到,对于每个节点,我们都有一个键,并在数组中存储节点的所有连接。
那么邻接矩阵和链表之间的区别是什么呢?好吧,链表在添加或删除节点时更有效,而矩阵在查询特定节点之间的连接时更有效。
为了看到这一点,想象我们想要向图中添加一个新节点:

要在矩阵中表示这一点,我们需要添加个整个新列和一个整个新行:
| A | B | C | D | E | |
|---|---|---|---|---|---|
| E |
而在链表中执行相同操作,只需添加一个值到 B 的连接和添加一个键值对来表示 E 就足够了:
{
  A: ['B', 'C'],
  B: ['A', 'D', 'E'],
  C: ['A', 'D'],
  D: ['B', 'C'],
  E: ['B'],
}
现在想象我们要验证节点 B 和 E 之间是否存在现有连接。在矩阵中检查这很容易,因为我们知道确切地表示该连接的矩阵位置。
| A | B | C | D | E | |
|---|---|---|---|---|---|
| A | 0 | 1 | 1 | 0 | 0 |
| B | 1 | 0 | 0 | 1 | 1 |
| C | 1 | 0 | 0 | 1 | 0 |
| D | 0 | 1 | 1 | 0 | 0 |
| E | 0 | 1 | 0 | 0 | 0 |
但在链表中,我们没有该信息,我们需要遍历表示 B 连接的整个数组并查看其中的内容。因此,可以看到每种方法都有其利弊。
使用邻接表实现的图可能如下所示。为了保持简单,我们将表示为无向无权图。
// We create a class for the graph
class Graph {
  // The graph has only one property which is the adjacency list
  constructor() {
    this.adjacencyList = {}
  }
  // The addNode method takes a node value as parameter and
  // adds it as a key to the adjacencyList if it wasn't previously present
  addNode(node) {
    if (!this.adjacencyList[node]) this.adjacencyList[node] = []
  }
  // The addConnection takes two nodes as parameters,
  // and it adds each node to the other's array of connections.
  addConnection(node1, node2) {
    this.adjacencyList[node1].push(node2)
    this.adjacencyList[node2].push(node1)
  }
  // The removeConnection takes two nodes as parameters,
  // and it removes each node from the other's array of connections.
  removeConnection(node1, node2) {
    this.adjacencyList[node1] = this.adjacencyList[node1].filter(v => v !== node2)
    this.adjacencyList[node2] = this.adjacencyList[node2].filter(v => v !== node1)
  }
  // The removeNode method takes a node value as parameter.
  // It removes all connections to that node present in the graph
  // and then deletes the node key from the adj list.
  removeNode(node) {
    while (this.adjacencyList[node].length) {
      const adjacentNode = this.adjacencyList[node].pop()
      this.removeConnection(node, adjacentNode)
    }
    delete this.adjacencyList[node]
  }
}

const Argentina = new Graph()
Argentina.addNode("Buenos Aires")
Argentina.addNode("Santa fe")
Argentina.addNode("Córdoba")
Argentina.addNode("Mendoza")
Argentina.addConnection("Buenos Aires", "Córdoba")
Argentina.addConnection("Buenos Aires", "Mendoza")
Argentina.addConnection("Santa fe", "Córdoba")

console.log(Argentina)
/* Graph {
  adjacencyList: {
    'Buenos Aires': [ 'Córdoba', 'Mendoza' ],
    'Santa fe': [ 'Córdoba' ],
    'Córdoba': [ 'Buenos Aires', 'Santa fe' ],
    Mendoza: [ 'Buenos Aires' ]
  }
} */
总结
在本文中,我们介绍了计算机科学和软件开发中使用的主要数据结构。这些结构是我们在日常生活中使用的大多数程序的基础,因此这是非常好的知识。
尽管这个主题一开始可能感觉有点抽象和令人生畏,但我相信我们只需将数据结构视为组织数据以更好地完成某些任务的方式,就可以更好地理解它。


评论 (0)